(+iw pl) |
編集の要約なし |
||
| 559行目: | 559行目: | ||
[[ru:Комнаты Fallout Shelter]] |
[[ru:Комнаты Fallout Shelter]] |
||
[[uk:Кімнати Fallout Shelter]] |
[[uk:Кімнати Fallout Shelter]] |
||
| + | [[zh:Fallout Shelter房間]] |
||
[[Category:Fallout Shelter rooms| ]] |
[[Category:Fallout Shelter rooms| ]] |
||
2018年8月16日 (木) 13:02時点における最新版
|
翻訳が必要
|
|
拡張が必要
この記事は「Fallout Shelter rooms」の情報を十分に提供していません。「編集」からFallout Wikiを手伝うことが出来ます。
|
|
| このページでは、Fallout Shelterにおけるroomをすべて掲載しています。 |
|
Fallout Shelterで建設可能な部屋は全部で23種類あり,それぞれレベル1からレベル2またはレベル3まで強化することができます.また,同じ種類かつ同じレベルの部屋を3つまで隣に並べることで部屋を拡張(merged)することができます.部屋一つにつき2人までの居住者を配置することができ,拡張した部屋なら最大6人を配置することができます.
生産系の部屋では配置された居住者の対応するS.P.E.C.I.A.Lによって一度の生産にかかる時間が短縮され,トレーニング系の部屋では配置された居住者の対応するS.P.E.C.I.A.Lを上昇させることができます.
階層について[]
Vaultには25の階層があり,ひとつの階層につき6つの部屋と2つのエレベーターを建設するスペースがあります.3つ以上のエレベーターを建設することも可能ですが,その場合部屋のためのスペースが犠牲になります.
各部屋の概要[]
| 名称 | 分類 | 対応する
能力 |
設置可能になる人口 | 基本コスト | コスト上昇 | レベル2へのコスト | レベル3へのコスト | 許容能力 | 生産量 | 大きさ |
|---|---|---|---|---|---|---|---|---|---|---|
| Vault door | Misc. | - | - | - | - | 500 | 2000 | - | - | 6 |
| Elevator | Misc. | - | - | 100 | +25 | - | - | - | - | 1 |
| Living quarters | Capacity | Charisma | - | 100 | +25 | 500 | 1500 | 2*n*(p+4)-2 | - | 3 - 9 |
| Power generator | Production | Strength | - | 100 | +25 | 500 | 1500 | 25*n*(p+1) | 2^(n-1)*10+2*(n-1)+? | 3 - 9 |
| Diner | Production | Agility | - | 100 | +25 | 500 | 1500 | 25*n*(p+1) | (2*n*(p+4))-2 | 3 - 9 |
| Water treatment | Production | Perception | - | 100 | +25 | 500 | 1500 | 25*n*(p+1) | (2*n*(p+4))-2 | 3 - 9 |
| Storage room | Capacity | Endurance | 12 | 300 | +75 | 750 | 1500 | 5*n*(p+1) | - | 3 - 9 |
| Medbay | Production | Intelligence | 14 | 400 | +100 | 1000 | 3000 | 5 + (10 * n) | 3 - 9 | |
| Science lab | Production | Intelligence | 16 | 400 | +100 | 1000 | 3000 | 5 + (10 * n) | 3 - 9 | |
| Overseer's office | Quests | - | 18 | 1000 | - | 3500 | 15000 | - | - | 6 |
| Radio studio | Production | Charisma | 20 | 500 | +200 | 1500 | 4500 | - | - | 3 - 9 |
| Weapon workshop | Crafting | - | 22 | 800 | +600 | 8000 | 60000 | - | - | 9 |
| Weight room | Training | Strength | 24 | 600 | +150 | 1500 | 4500 | - | - | 3 - 9 |
| Athletics room | Training | Agility | 26 | 600 | +150 | 1500 | 4500 | - | - | 3 - 9 |
| Armory | Training | Perception | 28 | 600 | +150 | 1500 | 4500 | - | - | 3 - 9 |
| Classroom | Training | Intelligence | 30 | 600 | +150 | 1500 | 4500 | - | - | 3 - 9 |
| Outfit workshop | Crafting | - | 32 | 1200 | +900 | 12000 | 90000 | - | - | 9 |
| Fitness room | Training | Endurance | 35 | 600 | +150 | 1500 | 4500 | - | - | 3 - 9 |
| Lounge | Training | Charisma | 40 | 600 | +150 | 1500 | 4500 | - | - | 3 - 9 |
| Game room | Training | Luck | 45 | 600 | +150 | 1500 | 4500 | - | - | 3 - 9 |
| Barbershop | Misc. | Charisma | 50 | 10000 | +5000 | 50000 | - | - | - | 6 |
| Nuclear reactor | Production | Strength | 60 | 1200 | +300 | 3000 | 9000 | 100*n*(p+1) | ? | 3 - 9 |
| Garden | Production | Agility | 70 | 1200 | +300 | 3000 | 9000 | 25*n*(p+1) | ? | 3 - 9 |
| Water purification | Production | Perception | 80 | 1200 | +300 | 3000 | 9000 | 25*n*(p+1) | ? | 3 - 9 |
| Nuka-Cola bottler | Production | Endurance | 100 | 3000 | +750 | 15000 | 45000 | 50*n*(p+1) | ? | 3 - 9 |
* n = 部屋の大きさ
* p = 部屋のレベル
同じ種類の部屋がすでにVaultに存在する場合,新たに建設するために必要なキャップは(既存の部屋の数×コスト上昇)の値だけ増加します.
生産系の部屋[]
Power generator,Diner,Water treatmentなどの施設が該当し,Vaultに必要な電力,食料,水を定期的に生産します.一度の生産にかかる時間はその部屋で働く居住者全員の対応するS.P.E.C.I.A.Lの合計値,部屋のサイズとレベル,働く居住者の幸福度に影響されます.装備品(outfits)によって居住者の能力値が10を超えた場合,能力バーには表示されませんが生産能力にはきちんと貢献します.所要時間が経過し生産が完了した部屋はその資源を回収するまで生産を停止します.生産が完了した部屋をタップし資源を回収する際に,働く居住者の運(Luck)に応じておまけのキャップがもらえることがあります.
生産に必要な時間[]
生産系の部屋には隠しステータスである時間プール(単にプールとも)があり,毎秒働く居住者たちの対応するS.P.E.C.I.A.Lの合計値に幸福度ボーナスを付与した値だけプールが増加します.プールが決まった値以上になると資源の回収が可能になり,資源を回収するとプールは0に戻ります.部屋を拡張するとプールの目標値は2倍,3倍と増加しますが部屋のレベルアップによる影響はないようです.働く居住者が部屋から移動してもプールの値は維持されます.
例えば,未拡張のPower PlantにStrengthが5の居住者を1人配置し,Vaultの幸福度による10%のボーナスがつく場合,毎秒5.5ポイントがプールに加算され,プールサイズ1320を満たすのに4分かかります.
各部屋のプールサイズ(予想値)
| Time Pool | ||
|---|---|---|
| Room | Pool Size | Base Time (in minutes) |
| Power Plant | 1320 | 22 |
| Nuclear Reactor | 1800 | 30 |
| Diner | 960 | 16 |
| Water Treatment | 960 | 16 |
| Garden | 1200 | 20 |
| Water Purifier | 1200 | 20 |
| Bottler | 1200 | 20 |
| MedBay | 2400 | 40 |
| Science Lab | 2400 | 40 |
| Radio Station | ?? | ?? |
Efficiency (resource*1000/(time*skill))[]
Bigger is better in this case. Some rooms are more efficient while you actively play (clicking more often); others are more efficient while running in the background. A clear example is the radio room. Although you would think making one 3-room radio is the best way to do it, it is not because if you login after 24 hours, the single room has stopped at 1 citizen, but three 1-room radio rooms give you 3 citizens after 24 hours. This scenario is not 100% accurate since there are chances for you to get 3 citizens, but the fact is that the first scenario stops at 1 citizen and the second one stops at 3 (which is better).
Why resource*1000/(time*skill)? Because if we increase skill then resources are also increased proportionally. Values are shown for skill 1 workers. 1000 is used because numbers are quite small.
| Room | Produces | Efficiency | Quantity* |
|---|---|---|---|
| Power generator (best efficiency) | Power | 8.18 | 10 |
| Diner | Food | 9.09 | 8 |
| Water treatment | Water | 9.09 | 8 |
| Nuclear reactor (best quantity) | Power | 7.27 | 13 |
| Garden | Food | 9.09 | 10 |
| Water purification | Water | 9.09 | 10 |
| Nuka-Cola bottler (best) | 1/2*Food+1/2*Water | 18.18 | 20 |
* Quantity is for logging out and resuming after room has finished production (for people who don't care about efficiency while playing, but login, collect resources, and logout).
The above table is for a first tier 1-room. Multiply Quantity and Efficiency with the numbers below to get these values for other configurations:
| Single Room | Double Room | Triple Room | |
|---|---|---|---|
| Tier 1 | 1.0 | 2.1 | 4.4 |
| Tier 2 | 1.2 | 2.5 | 5.2 |
| Tier 3 | 1.5 | 3.1 | 6.6 |
You can also apply this formula:

where R is the number of rooms merged together and T the Tier of the room
Rush production[]
Production rooms can "rush" to produce resources quickly. Depending on the probability given in-game, the room can instantly yield resources, experience and a number of caps equal to the percentage of the chance taken. A failed rush attempt leads to an inevitable incident in that room; this may be a fire or an infestation of radroaches/mole rats. Each attempt to rush production, whether successful or not, raises the chances of failure in the next rush. The room's rush penalty slowly decays over time. The total chances to fail a rush in a specific room is affected by the luck and the traits of the workers and the room's current rush penalty. With a successful rush attempt, all workers of a room gain a total of 10 points of happiness over the next 30 seconds. A failed rush attempt lowers the workers happiness by 10 points. Only workers that stay in a room during the entire 30 seconds after the rush will receive the full bonus/penalty.
It is possible to cap the rush failure chance below 50% with high luck and matching SPECIAL statistics of the workers. At this point, the rush failure chance will alternate between 50% and 40%.
If your goal is to:
- produce resources, build big, non-upgraded rooms (for water, food, power) and big, upgraded rooms (for RadAways, Stimpaks)
- produce caps, build multiple small, non-upgraded rooms
- successfully rush rooms for the quests, build multiple small, non-upgraded rooms
Training rooms[]
These types of rooms raise one of the traits for the dwellers stationed in it. Dwellers appear to "remember" partial training, so there is no penalty to pulling a dweller out of the gym to temporarily provide some spare power. Training is an important mechanic to improving the effectiveness of your dwellers both in the Vault and in the Wasteland
Training times[]
Similar to Production rooms, dwellers have a point pool for each of their stats. when this pool fills up the player can level up the appropriate stat. Training time depends on how large the pool is and how fast the dweller can fill the pool.
| Training Pool | ||||
|---|---|---|---|---|
| Skill point | Pool Size | Base Time | Pool to max | Time to Max |
| 1 | 1800 | 00:30 | 297000 | 3::10:30 |
| 2 | 5400 | 01:30 | 295200 | 3::10:00 |
| 3 | 10800 | 03:00 | 289800 | 3::08:30 |
| 4 | 18000 | 05:00 | 279000 | 3::05:30 |
| 5 | 27000 | 07:30 | 261000 | 3::00:30 |
| 6 | 37800 | 10:30 | 234000 | 2::17:00 |
| 7 | 50400 | 14:00 | 196200 | 2::06:30 |
| 8 | 64800 | 18:00 | 145800 | 1::16:30 |
| 9 | 81000 | 22:30 | 81000 | 0::22:30 |
When training, a dweller adds one point to the pool every second, amplified by the Vault's happiness bonus, the number of dwellers in the room, and the upgrade level of the room.
Points per second

      where D is the number of dwellers training in the room (1 ~ 6)
            T is the tier of the training room  (1 ~ 3)
            H is the Vault happiness bonus (0.01~0.1)
Since the minimum bonus from the vault's happiness is 1.01, dwellers will always train at least slightly faster than the listed base time. Normally this can take roughly 3 days 10 hours. However, dwellers can increase their points per second up to 1.331, which can reduce up to 25% of the time needed to train (training at 4/3 times speed reduces the base time by 3/4) and reducing the total training time to 2 days 12 hours 52 minutes and 36 seconds.
Merged rooms[]
A maximum of three rooms of the same type can be merged to one bigger room. Rooms are automatically merged by placing a room of the same type next to an existing room of tier 1. If placed next to a room of higher level, the new room will be merged as soon as it is upgraded to the level of the existing room. All beneficial effects of the two rooms are accumulated upon merge: a double training room will train up to four dwellers, a triple training room up to six.
Merged rooms have advantages compared to the same number of unmerged rooms. Upgrading merged rooms costs less than the cumulative upgrade costs of the same number of unmerged rooms, so consider merging rooms to triples before upgrading them. Also, merged rooms are more productive and effective: production rooms will generate resources faster while training rooms can hold more dwellers, which reduces training times.
However, merged rooms have downsides: the bigger the room is and the less it is occupied, the harder/longer it will be to get rid of an incident like radroaches or fire, depleting your dwellers' health faster. Tier also influences the difficulty; the higher the tier, the longer the incident will be. Keep this in mind before trying to rush production in a 3-merged top tier room with only one dweller inside.
A fully occupied merged room can be deadly to invaders if your dwellers are well trained and fully equipped. Make sure the two first floors contain fully merged rooms with trained dwellers to take out most of the intruders.
Mysterious Stranger[]
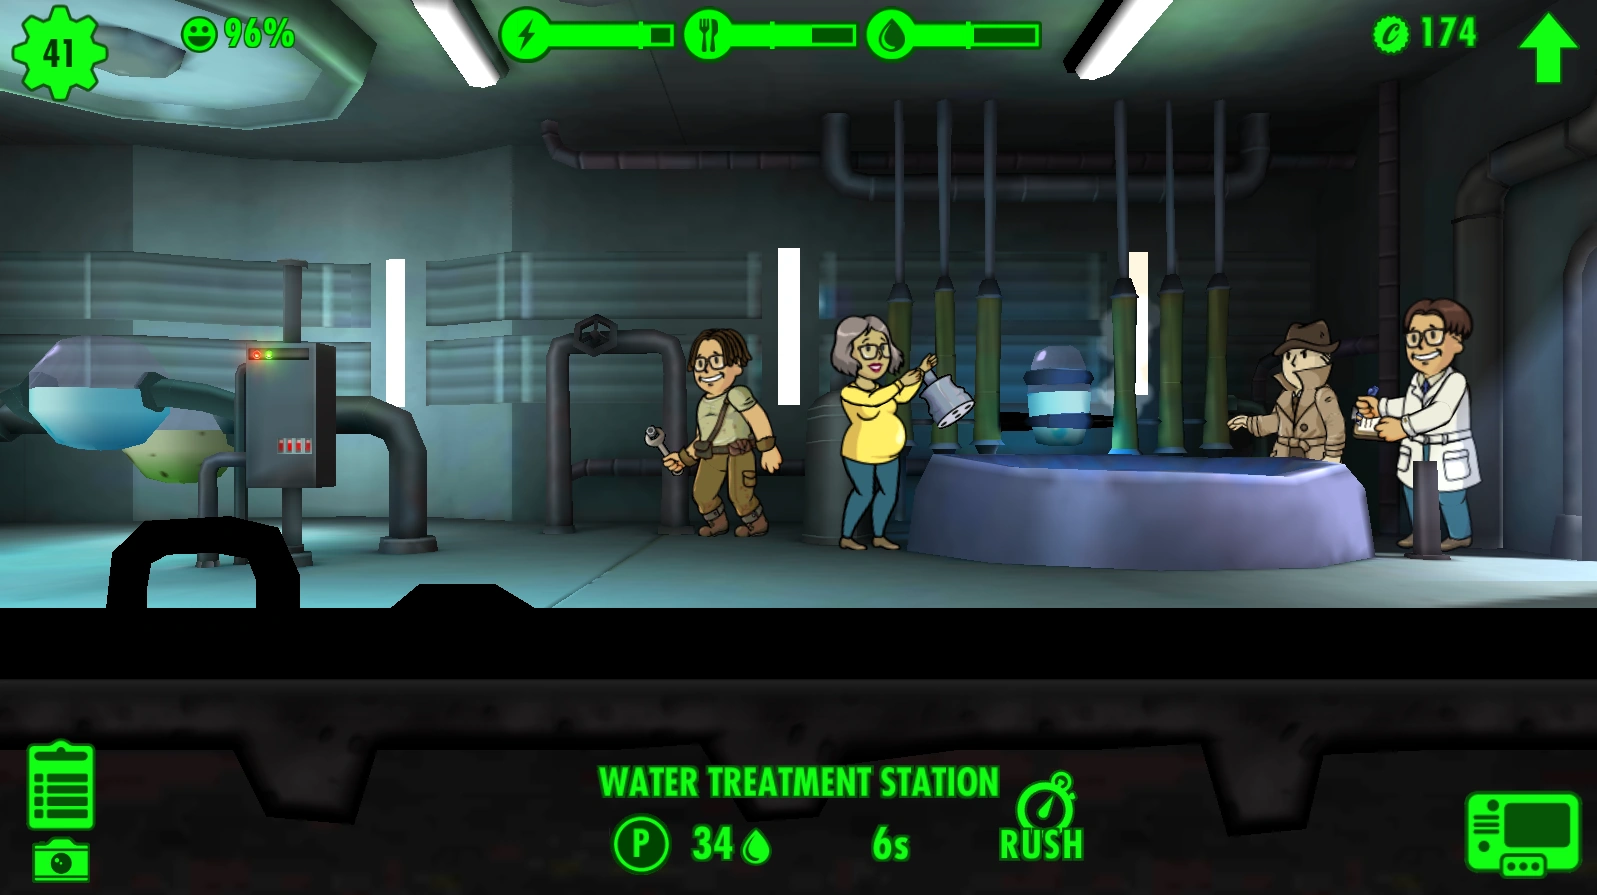
Mysterious Stranger in Water Treatment Station
Randomly, a Mysterious Stranger will appear in a room for a short time accompanied by an audio cue which is louder depending on his distance from your view. When clicked, the Stranger disappears and you are awarded a random amount of caps. The Stranger can appear in any room including empty rooms, elevators and the vault entrance, but will not appear during a crisis. If you do not click the Stranger in time, another sound will play and the Stranger will disappear without awarding you any caps.
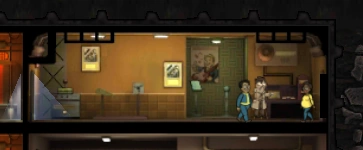
The Mysterious Stranger Appearing in a Radio Room while zoomed out
As the vault grows, it becomes harder to search it quickly and harder to find the Mysterious Stranger in time. However, by zooming out to the furthest level and disabling HD Zoom Out in Settings he becomes easier to spot.
|